Unless you’ve been living under a rock, you’ve probably seen or heard just about everything about the Canon EOS R5. However, even with the multitude of videos I’ve watched and articles I’ve read, I didn’t realize a few things about the R5.
The R5’s 45 megapixels, 5,940 user-selectable AF points, 12/20 fps, 8K video, eye AF, flip screen, and IBIS are just a handful of the many reasons to upgrade. Each of these features on its own might be a reason to upgrade for some users. Pack them all into one camera, and there’s no doubt that this is a significant and worthy upgrade for Canon DSLR shooters.
A few of us held out and didn’t jump into the Canon mirrorless cameras until the R5 came out. Once it did, we had to find one in stock to purchase. Here are a few of the things I discovered after using it for just a short time.
More Focus Zones and They’re Movable!
As much as I love my Canon 5D Mark IV, one of the things that always bothered me about it was the focus area’s limitation. Of course, just about everyone knows that mirrorless cameras can move focus points across almost the entire sensor area. However, one thing that I did not realize when I saw the R5’s new focus zones was that the wide focus zones could be moved up and down or left and right. The Canon 5D Mark IV’s large focus zone just sat there in the middle of the screen.
The new wide and tall focus zones are a very nice addition made possible by the mirrorless platform, adding the capability to move the large zones around the screen. I can think of many wildlife and action sports photography scenarios where this would be very useful. The zones allow for full horizontal or vertical focusing while limiting the areas that may cause an undesired focus lock.
Manual movement of the autofocus point is much faster than with the 5D Mark IV. It takes a little bit to get used to, but the addition of the ability to move the focus point by placing your thumb on the rear LCD is quite useful. If you prefer to use the joystick to move the autofocus point, there is a “sensitivity- AF pt select” option in AF menu 5. Changing this option will speed up or slow down the AF point movement, although there’s not a dramatic difference between the three settings.
There’s No Live View Button
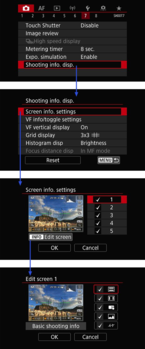
Previously, when doing landscape photography, I would often use the live view button of the 5D Mark IV to switch between the viewfinder and the LCD screen. One of the reasons was partially due to my failing eyesight and the other to preview the scene. The Canon R5 can do the same, of course; however, there are a few extra button presses in the default configuration. Basically, you repeatedly press the info button to cycle between the LCD screen’s five views.
You can customize which of these five screens are available by checking or unchecking the tick boxes on the “Screen info. settings” menu page. You can also select what information is displayed on screens 1 through 3 on the “Edit screen” pages of each screen.
You Don’t Need To Shoot Through the Viewfinder for the Best Autofocus Performance
If you’ve shot with the Canon 5D Mark IV, you’ve probably noticed that autofocus performance in Live View mode is less than spectacular for moving subjects. With the R5, there’s no difference between using the LCD screen and the viewfinder, as the focusing is always done with the sensor.
As long as you can sufficiently hold the camera, feel free to use the LCD. Some portrait photographers actually prefer this method, as it allows them to work more efficiently with their models.
Combining the eye AF and the tilting LCD screen means holding the camera high over your head or in awkward positions is easy and accurate. This shooting method may really open up some great possibilities for some photographers. Using the LCD screen instead of the viewfinder may also use less battery power.
Miscellaneous Benefits
There’s no path for light to sneak past the mirror assembly with mirrorless bodies, which means that you don’t have to worry about light leaks with long exposures. However, I would note that I never had an issue with light leaks with my 5D Mark IV, so I never covered the viewfinder on long exposures.
Since there’s no mirror, there’s no “Mirror Lockup” mode on the R5. I always found this to be a real pain with the 5D Mark IV. It wasn’t cumbersome to initiate, as I had that setting on a custom menu. It was remembering to turn it off that often made me miss a shot at a later time.
Without the pesky mirror, there is no need for Micro AF adjustments, which is such a relief since Canon cameras did not have an automatic mode for micro AF adjustments like Nikon DSLRs do. It’s a real joy not to have to set up micro AF adjustment when purchasing, renting, or borrowing lenses.
Speaking of the shutter, the R5 is rated at 500,000 shutter actuations as compared to the 150,000 of the Canon 5D Mark IV. Although you’ve probably heard references to it in videos, you really can’t appreciate how quiet the mechanical shutter is until you actually shoot with it.
In the “it’s about time” category, using the rear mode dial for ISO control is just splendid. You can also customize which dial controls what feature, which is quite useful with the addition of the Control Ring on the RF lenses and the Control Ring adapter.
Conclusion
The Canon R5 is an excellent upgrade for Canon 5D Mark IV shooters and even more so for photographers shooting older DSLRs. Although it does take a little bit of time to get used to the new button layout, once you do, you’ll love this camera. The autofocus features alone have increased my keeper rate significantly. These are just a few of the things that I’ve noticed since having the R5. Do you have any things that you were surprised about? Let me know in the comments!