One of the biggest confusions that you might notice as you venture into astrophotography is that photographers and astronomers measure their equipment differently. Photographers tend to refer to their lenses in terms of their focal length, while astronomers refer to their telescopes by the diameter of their opening. Thus, a 75mm f/6 telescope has a focal length of 450mm. Meanwhile, a 75mm camera lens at f/6 has an aperture of 12.5mm. If a photographer is told that someone is shooting a 155mm lens hand-held, it would not raise an eyebrow, but an astronomer told the same thing would be incredulous! I can only barely lift my 155mm telescope onto its mount!
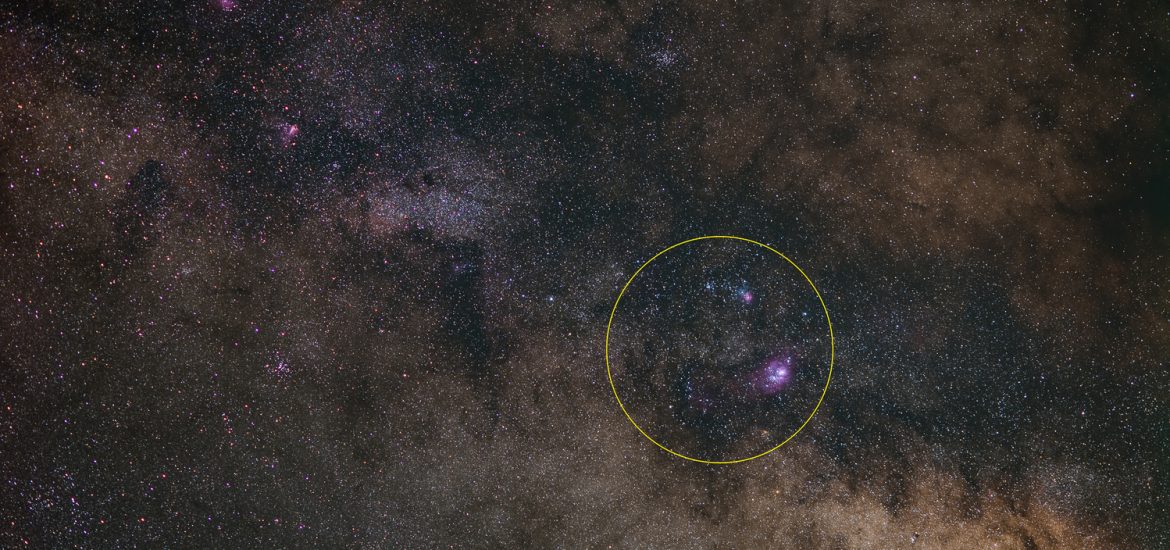
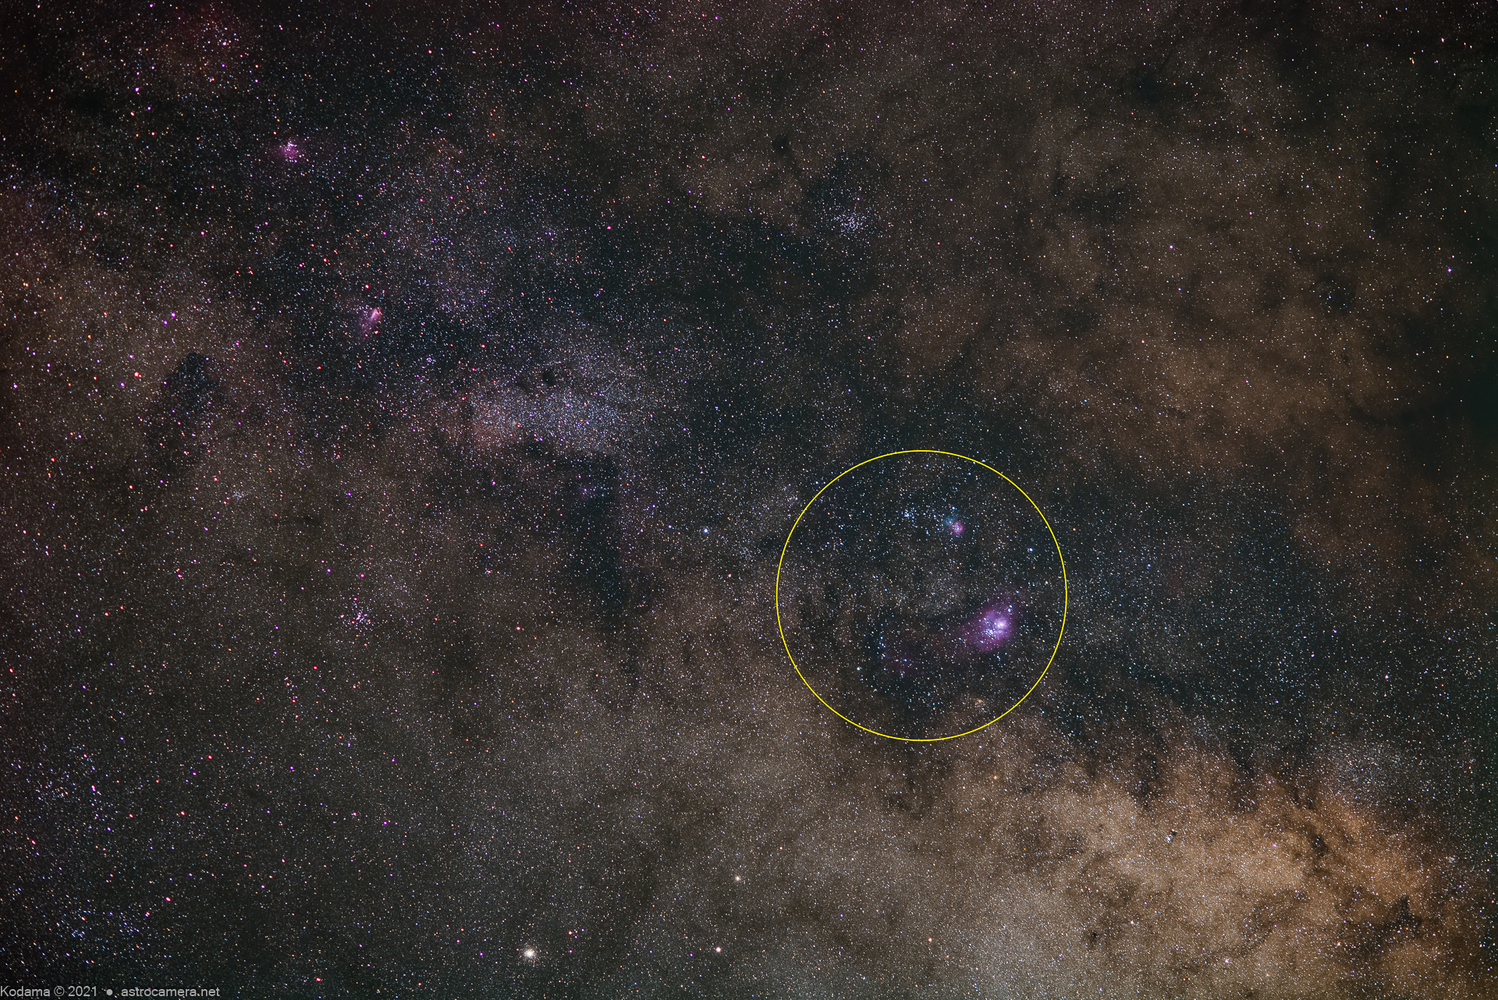
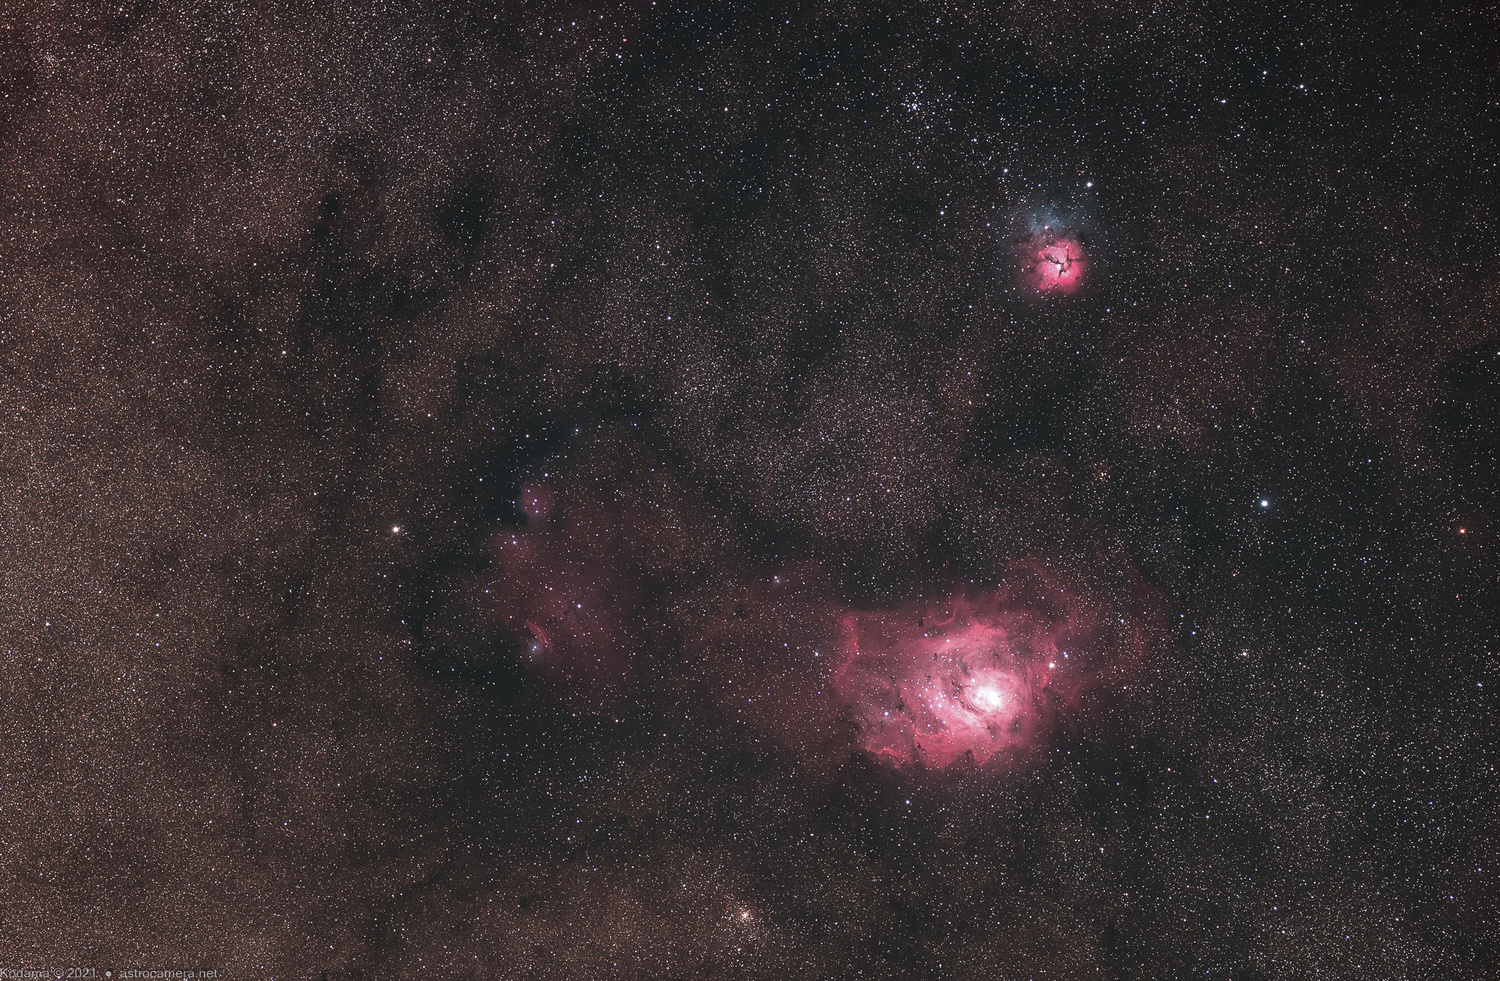
As another reference example, check out the equipment In the lead photo above. A 107mm astronomical scope sits alongside a 105mm camera lens — big difference! See below for shots from the two setups. The view from the 107mm telescope is circled in the shot from the 105mm lens.
Another point of confusion is that while photographers’ lenses are almost exclusively made of refractive elements, astronomers use a wide variety of optical designs, many of which also include mirrors internally. As telescopes get larger, mirrors are favored for the primary, because they can fold the light path down on itself, and producing large precision mirrors is not as expensive as producing large lenses. Large lenses become heavy and require optically perfect properties throughout the glass, while just the surface is important in a mirror.
Prime Lens Versus Prime Focus
Another source of confusion is the use of the term “prime.” In photography, a prime lens has a fixed focal length, as opposed to a zoom lens which can vary focal length. In astronomy, all telescopes are of a fixed focal length (with the exception of some visual telescopes equipped with a zoom eyepiece), but you may hear references to “prime focus.” Technically, the prime focus is the position at which the primary element (lens or mirror) comes to focus. In the past, for reflecting telescopes, only specialized telescopes (e.g. Schmidt camera) and the largest telescopes, such as the 200” Hale (Palomar) telescope, allowed placing the sensor (film) at the prime focus.
Generally speaking, some additional optics (lenses) are required at prime focus (near the imaging plane) to correct for distortions introduced by the primary optics. In astronomy, you may hear references to coma correctors and flatteners, which are necessary for achieving good images across the entire imaging plane. Focal reducers or Barlow lenses, which shorten or lengthen the effective focal length of the telescope, are also sometimes used. Barlow lenses are the equivalent of photographic teleconverters, but are available for more extreme magnifications of 2x, 3x, and more.
The other general difference is that camera lenses (even prime lenses) have complicated optical designs with many elements (sometimes over a dozen). On long focal lengths, the extra optics help to shorten the overall (physical) length of the lens. On very short focal length lenses, extra optics are needed to move the focal point away from the lens enough to reach back into the sensor inside the camera body.
In astronomy, telescopes are designed with as few optical elements as possible. Each optical element introduces places where interfering internal reflections can be generated or unwanted absorption of light can occur.
Magnitudes and F-stops
Even the way we think about light can be confusing in photography versus astronomy. In general, photographers worry more about the total amount of light reaching their camera in terms of f-stops (factors of two). In the “exposure triangle” (digital) photographers can trade off aperture, exposure time, or sensitivity (ISO).
In astronomy, one of the corners of the exposure triangle (aperture) does not exist for astrophotography, aside from changing to a bigger or smaller telescope. Except for a few circumstances, astronomers are operating telescopes wide open. Moreover, since most of the objects of interest are emitting light, astronomers refer to the “magnitude” of the targets. These are measured in steps of 2.512 for historic reasons, but the simplest way to think about it is that a 5-magnitude difference is a factor of 100 brightness difference (about 6.6 stops).
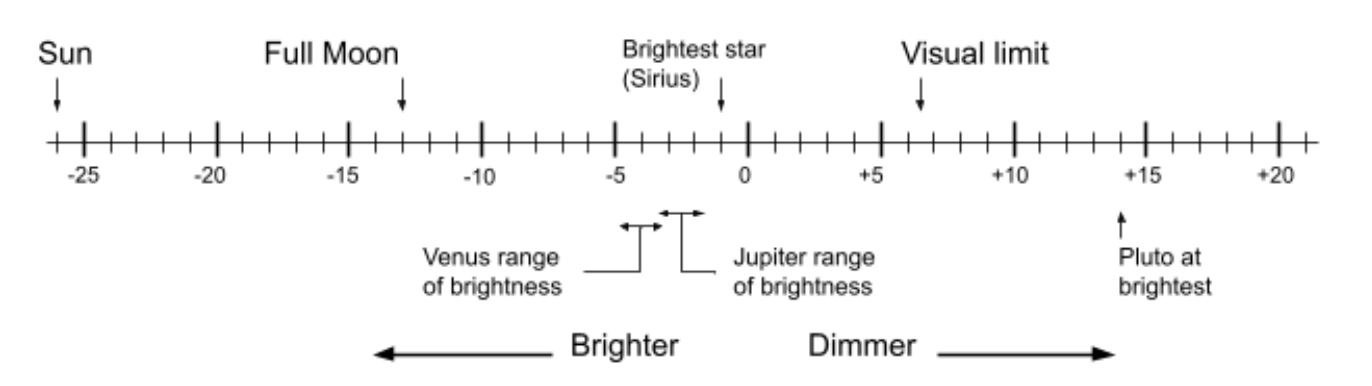
Another source of confusion is that a magnitude difference of +5, means 100x dimmer, and a difference of -5 magnitude is 100x brighter. On top of this, a visual magnitude reference point has been established so that the brightest stars in the sky visible with our naked eyes are about visual magnitude -1, again for historical reasons. With the unaided eye, the limit of the stars we can see is generally accepted to be about visual magnitude +6.5.
Keeping in mind the eye’s visual magnitude limit of +6.5, if we take the pupil’s maximum opening at about 5mm and increase it to 50mm by using a small telescope since the amount of light captured depends on the area of the aperture, we can receive 100x more light, or a 5 magnitude boost to +11.5. Thus even a small 50mm telescope (typical size of a finder scope or binoculars) greatly increases the magnitude limit of stars we can see or photograph. Of course, this is theoretical. In practice, the brightness of the sky due to light pollution or aurora decreases our sensitivity and looking at a low angle through more atmosphere also decreases our ability to detect a dim star.
For sky objects with an extended size, the visual magnitude rating is the total light coming from the object, so compared with a star of the same magnitude, it will be harder to see. For example, the Andromeda galaxy visual magnitude is given at about +3.4, which is equivalent to a moderately bright star, but in practice, it is much harder to see than its visual magnitude might imply since it is spread out over a large patch of sky (several times larger than the moon).
Filters
Yet another area of confusion is the rating of filters. Photographers often use filters to decrease the light enough to take long exposures so that bodies of water or cloud movements will be smoothed out. Astrophotographers don’t do this, but a filter is necessary for photographing the sun, where the problem is far too much light. The sun has a visual magnitude of -26, which is beyond even what the fastest shutter speed on consumer cameras can cope with, and will probably burn a hole through a camera’s shutter in a few seconds.
For solar photography, extremely dense filters are used, which are rated at optical densities of 4 to 5, which are powers of 10 in light reduction (10,000 to 100,000, respectively). One of the areas of confusion is that optical density ratings differ from the neutral density (ND) ratings of camera filters, which offer much less light reduction (up to 4 or 5 stops) and are not consistent in their density rating scales. See Wikipedia’s table for a convenient way to see the correspondence between optical and various neutral density scales.
Hydrogen-Alpha Filters
A further source of confusion is that astrophotographers often use very narrow band filters to enhance the visibility of glowing gasses commonly found in deep-sky nebulae. Using these filters will increase the contrast between the nebulae of interest and the background sky. Typically, these filters will pass 5-10 nanometers of light around the wavelength of interest out of the visual band which extends from around 400 nanometers (violet) to 700 nanometers (red). Though these filters may look similar to ordinary screw-on camera filters, they are typically made from precision multi-layer coatings instead of colored glass or gel material and are correspondingly more expensive.
These deep-sky astronomical filters also differ from solar astronomical filters, which isolate even narrower bands. These specialized (and expensive) filters are typically less than 0.1 nanometers wide so that details can be seen on the solar surface and the atmosphere has enhanced contrast. These special solar filters may be bulky multi-part arrangements for the front and back ends of the telescope instead of the thin pieces of glass or gel photographers use in front of camera lenses.
Sky Coordinates
With many modern astrophotographers using computerized go-to mounts, familiarity with the sky coordinate system is less common these days, but it’s still useful to understand the coordinate system of the sky. Basically, the angular distance used in the N-S direction matches the latitude coordinates on the Earth. The coordinates, called Declination, run from zero degrees directly above the Earth’s equator to +90 degrees above our North pole, and similarly down to -90 degrees above our South pole.
In the direction corresponding to longitude, however, astronomers call this coordinate “Right Ascension” (RA). Just as the terrestrial longitude has the 0 at Greenwich, with degrees East (+) and degrees West (-) measured from it, the right ascension has a reference point at the Sun’s location on the spring equinox. But more important to note is that Instead of using degrees/minutes/seconds, astronomers use hours/minutes/seconds, increasing eastward from 0 hours through 23 hours and back to 0, like a 24-hour clock. What this means is that 1 minute of angle in RA is not equal to 1 minute of angle in Declination. It is 15x bigger in RA than in Declination. And to add to the confusion, when the separation between objects in the sky is being discussed, “normal” angular measurement is used — 360 degrees = 21,600 arcminutes = 1,296,000 arcseconds.
Confused Yet?
If you were confused by any of the points above, don’t worry. I suspect many astrophotographers aren’t even aware of what might be a confusing, subtle overlap of terms in photography and astronomy. I may well be in the same position. If you have encountered any points of confusion that I haven’t brought up, comment below!