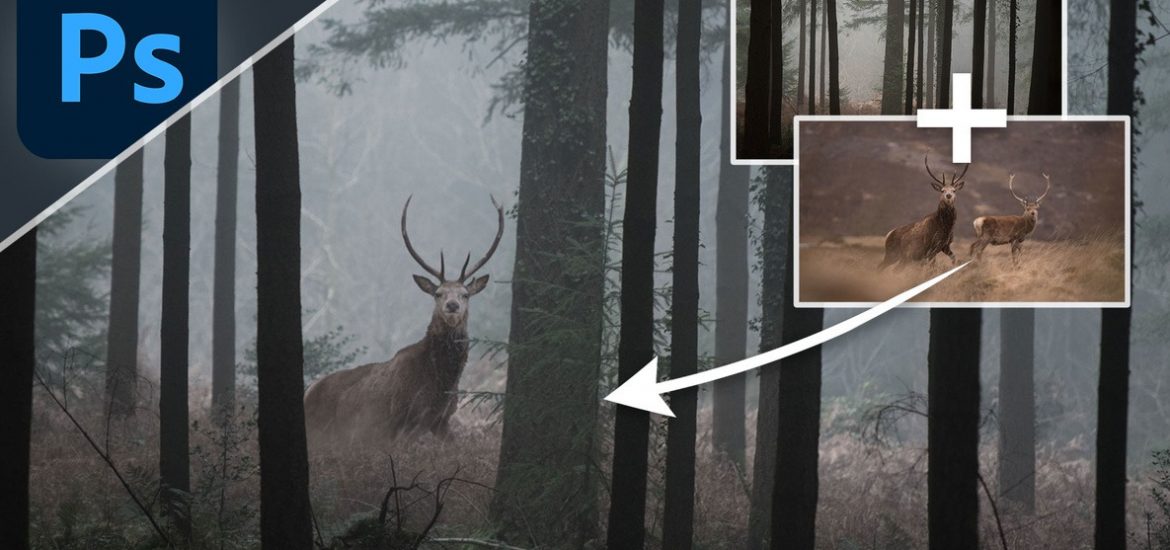
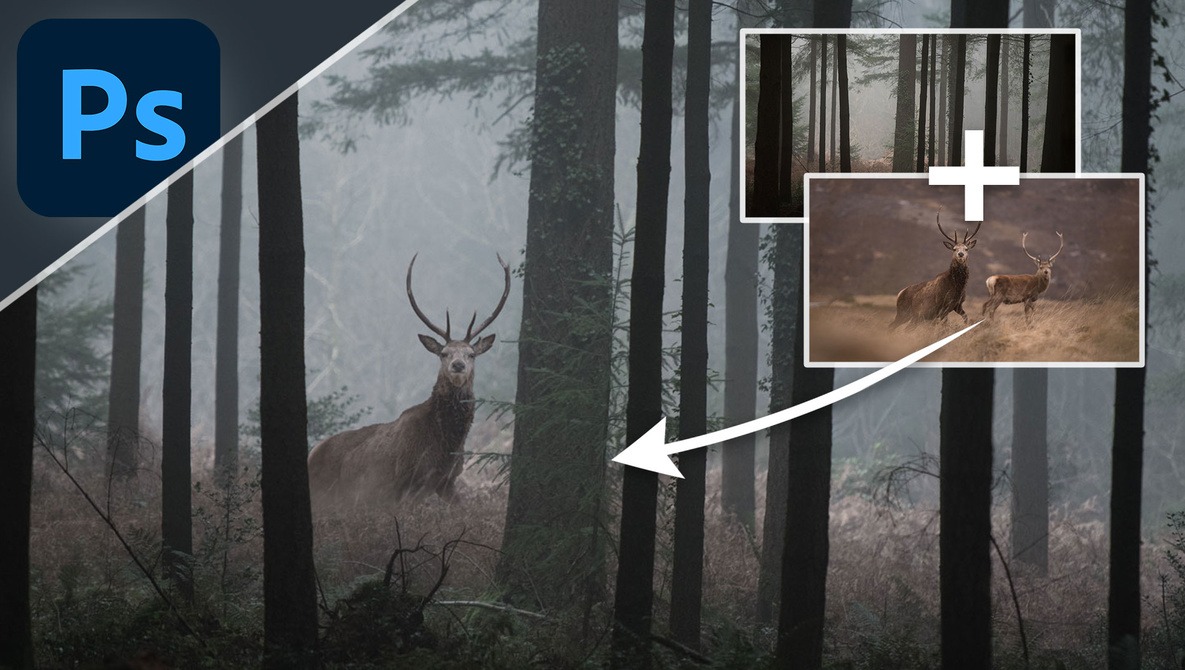
Capturing a great landscape photograph is extremely rewarding because a lot of things have to come together in order to nail it. But sometimes no matter how hard you try there’s just a little something missing. In this walkthrough, I’ll show you how to enhance your landscape images with a composite in Photoshop CC.
The main premise is to composite together two or more images to create a new scene. This could be as simple as planting a deer in a forest or it might be more involved with multiple photographs coming together to generate something otherworldly. Either way, the tips, and techniques are the same. It all involves working with colors, tones, and masking to produce something that not only looks realistic, but a photo that’s greater than the sum of its parts.
For this example, I’ll be taking two of my shots, one of a red deer stag and the other of a misty forest, and combining them to make it look as though the deer was in the forest all along. With a few simple steps, I’ll show you how to balance colors, make curve adjustments, and make accurate masks that make the images blend seamlessly together.
1. Import Your Photographs
The first thing to do is to get your images together in one Photoshop document. My favorite way of doing this is to open one photo in Photoshop by clicking and dragging the image into the Photoshop CC window and then simply clicking and dragging the other on top of it. Once the second image pops up as a separate layer be sure to press Enter or click the tick at the top of the window to allow it to import.
2. Make a Quick Selection
Next, I need to make a selection around the deer. I chose to isolate the foreground deer because that’s where my focus lies in the image, using the deer in the rear wouldn’t have been so fruitful as it’s slightly out of focus. I selected the deer layer in the layers palette and used the Object Selection tool (W) to draw a square around the deer. Photoshop then automatically selected the deer using its AI-powered brain and I was halfway to getting a decent cut-out.
3. Refine With the Lasso
I say halfway because there were a few areas where the Object Selection tool didn’t make a perfect job of it. That’s okay though, I simply zoomed in and used the Lasso tool (L) to add or subtract from my selection. If you want to switch between adding or subtracting from the selection just head to the respective icons at the toolbar at the top of the window while you have the tool selected.
There are better ways of making cut-outs, especially when it’s a little more complicated and the automatic selection tools aren’t super accurate. I like to resort to the Pen tool (P) when this happens because I can draw a path around my subject, which contorts and bends depending on how you use it. The Pen tool also allows you to edit the path so that if you make a mistake part-way through you can correct it. But there were only a few sections that I needed to grapple with for this example so I used the Lasso tool instead.
4. Apply a Mask
With the selection now perfected it’s time to turn this into a mask. Head down to the bottom of the Layers palette and click on the Add Layer Mask button. The selection will now appear with the rest of the layer disappearing. If you find that the very thing you wanted to cut out has disappeared and the entire background is still visible (the opposite of what we’re trying to achieve) then with the mask selected press Ctrl + I to invert it and your subject will return (with the background cut out).
5. Resize and Reposition
Now, obviously, your two images may not match up perfectly in regards to relative sizes or proportions, so you’ll have to make some changes if you want things to look more realistic. With the newly masked layer selected grab the Move tool (V) and grab the transform controls around the edge of the frame to then click and drag to resize the image. I prefer to choose one of the corner transform controls.
Depending on your version of Photoshop you’ll either be able to resize the image proportionally or you’ll need to hold Shift while doing this to maintain the correct aspect ratio. You’ll see what you need to do by just moving the transform controls back and forth. I then repositioned the deer so that it appeared to be walking in amongst the dead ferns in the distance.
6. Refine the Mask
I needed to refine the mask further to take into account the extra foliage that would be in front of my repositioned deer. I noticed a couple of overhanging branches from the evergreen trees in the foreground were hidden behind the deer so I reduced the opacity of the deer layer so that I could see both where the deer was and the position of the branches. I then selected the mask and used the Brush tool (B) to paint over the branches to reveal them.
The amount the brush reveals depends on the foreground color so it’s best to revert to pure white for the foreground color. To make sure you’re using pure white simply press D and then X on your keyboard respectively while the Brush tool is selected. This will ensure your foreground color is white.
7. Blend the Bottom
Next, I had to blend the bottom of the deer in with the ferns below its body. I took the Brush tool again and right-clicked on the image to adjust the brush properties. I set a relatively soft brush (Hardness 12%) and chose a large-ish brush size (150 px). That’s because I wanted to gently blend the bottom of the deer in with the foliage beneath, taking advantage of the misty nature of the forest scene which afforded a slight gradation between foreground and background in the photo. I made a few passes over the deer’s legs and belly at 100% brush opacity before dropping it to 20% (in the toolbar at the top of the window) and fading in a few more brush strokes for a more gradated look.
8. Add a Curves Filter
The deer is now in the right spot and has been masked effectively to suit its position in the forest. But it still sticks out like a sore thumb and that’s because the tonal values don’t match the misty forest scene. It’s time to make my first adjustment to the look of the deer. At the bottom of the Layers palette, I clicked on Create a new fill or adjustment layer and chose Curves. The Curves adjustment layer allows me to manipulate the tonal value from deepest blacks right up to brightest whites. I wanted the adjustment layer to control only the deer so I placed my cursor underneath the new adjustment layer, held Alt on the keyboard, and clicked when a box with an arrow appeared. The adjustment layer will now control only the one layer beneath it and not make changes to the forest scene.
The mist in the photograph washes out a lot of dark blacks so I made sure to pull the black point up on the graph to develop more of a gray tone which matched the shadows in the foliage around the deer. The highlights on the deer were also a little bright so I placed a point on the Curves graph near the top-right and dragged it down slightly. This darkened the shadows a little too much though (the Curves graph will react to any points you drop on it and bend slightly) so I added another near the bottom-left to boost the shadows again.
9. Make a Global Adjustment
Now that the deer and forest are matching up tonally I wanted to add a final adjustment layer to tie the two images together. By clicking on a new adjustment layer and choosing Hue/Saturation I then ticked the Colorize box in the window that appeared and set a blue hue. The effect can be quite strong so I turned the Saturation slider down to +18. To balance the two photos I then reduced the Opacity of the Hue/Saturation adjustment layer until I felt there was a good blend between the warm tones of the original photograph and the new adjustment layer.
10. Make a Crop to Finish
You can leave it there if you photo is all done, but since the deer was so small in the frame I wanted to make a slightly smaller crop to make it more apparent. I used the Crop tool (C) and set my aspect ratio to 16:9. I then dragged the handles around the edge of the crop overlay until I found a crop that worked for me. You can reposition the crop by clicking anywhere inside the crop area and dragging it around. Now my landscape composite was done all I had to do was save.